

Usually, I could find tutorials or instructions for the real cases. But not this package. I couldn’t find any of blogs or videos using this package to show on UI. Also, I needed myself using separate app structure. So, I decided to write my own.
Please note that there won’t be a lot of explanation of code. This post will be just the step by step to build.
Using Ubuntu 22.04.2 at the moment writing this.
- Prerequisites
- Start a Project
- Create Login Page
- Create Dashboard Page
- Install django-activity-stream package and settings
- Update Dashboard
If you just need to know how to setup the package, jump to here.
1. Prerequisites
- VSCode or other IDE installed.
- Python installed.
- pip installed.
- I am assuming it would be read by someone who has some knowledge of programming, python and django. Just in case you are a very beginner, please see this or this post for how to start a django project little more detail.
2. Start a Project
- create a new directory for the project
- create virtual environment
mkdir dj-activity-stream-practice
cd dj-activity-stream-practice
python -m virtualenv venv
- activate virtualenv
source venv/bin/activate
venv/Scripts/activate # for Windows
- install Django in the virtual environment
pip install django=="specific version"
pip install django # without version install the latest
- start django project
django-admin startproject activity_stream .
- create database and super user
python manage.py migrate
python manage.py createsuperuser
3. Create Login Page
- You might not need this step, but I do it for myself to practice creating separate app.
- However, we need login and out to get the user login/out activity
- Here is another way to create login page.
- create an accounts app first with bash script
python manage.py startapp accounts
- open up the VSCode or any other IDE you prefer.
- update settings
INSTALLED_APPS = [
    # other apps
    "accounts",
]

TEMPLATES = [
    {
        "DIRS": [BASE_DIR / "templates"],
    },
]
- update project urls.py to link (or point?) urls to accounts app
from django.contrib import admin
from django.urls import include, path
from django.views.generic.base import TemplateView

urlpatterns = [
    path("admin/", admin.site.urls),
    path("", TemplateView.as_view(template_name="home.html"), name="home"),
    path("accounts/", include("accounts.urls")),
]
- You can go to localhost:8000/accounts/ to login. However, you will get “page not found” error when you go to localhost:8000. that’s why we need the second path to home.html is needed.

- create urls.py file under accounts app
from django.urls import path
from accounts import views

urlpatterns = [
    path("", views.home, name="home"),
    path("login/", views.login_view, name="login"),
    path("logout/", views.logout_view, name="logout"),
]
- update accounts/views.py
from django.shortcuts import render, redirect
from django.contrib.auth.forms import AuthenticationForm
from django.contrib.auth import login, logout


def home(request):
    return render(request, "home.html")

def login_view(request):
    if request.method == "POST":
        form = AuthenticationForm(data=request.POST)
        if form.is_valid():
            user = form.get_user()
            login(request, user)
            return redirect("home")
    else:
        form = AuthenticationForm()
    return render(request, "accounts/login.html", {"form": form})


def logout_view(request):
    logout(request)
    return redirect("home")
- create templates directory on root directory and create base.html and home.html in it.
<!DOCTYPE html>
<html>
<head>
  <meta charset="utf-8">
  <title>{% block title %}Django{% endblock %}</title>
</head>
<body>
  <main>
    {% block content %}
    {% endblock %}
  </main>
</body>
</html>
{% extends 'base.html' %}

{% block title %}Home{% endblock %}

{% block content %}
{% if user.is_authenticated %}
  Hi {{ user.username }}!
  <p><a href="{% url 'logout' %}">Log Out</a></p>
{% else %}
  <p>You are not logged in</p>
  <a href="{% url 'login' %}">Log In</a>
{% endif %}
{% endblock %}
- create accounts directory in templates, and create login.html
{% extends 'base.html' %}

{% block title %}Login{% endblock %}

{% block content %}
<h2>Log In</h2>
<form method="post">
  {% csrf_token %}
  {{ form.as_p }}
  <button type="submit">Log In</button>
</form>
{% endblock %}
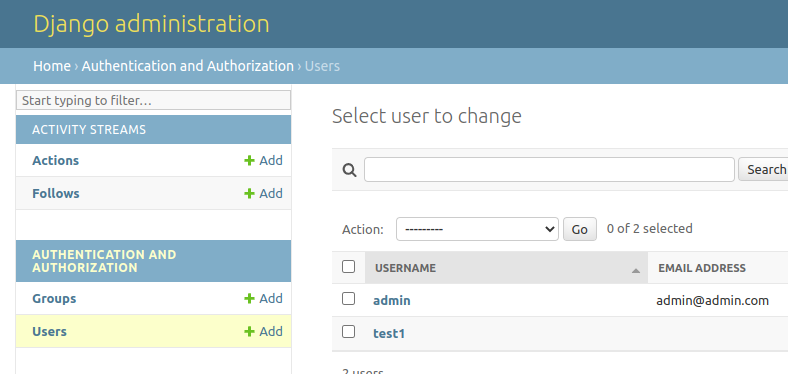
- runserver and test if you can login with super user account.
- to test more, create one or more regular users on django admin page.
- to go to django admin page, go to
localhost:8000/admin/
4. Create Dashboard Page
- stop the server or start new terminal
- create a new app name dashboards through the terminal
python manage.py startapp dashboards
- add dashboard app on the settings.py
INSTALLED_APPS = [
    # other apps
    "accounts",
    "dashboards",
]
- add dashboards app to project urls.py
from django.contrib import admin
from django.urls import include, path
from django.views.generic.base import TemplateView

urlpatterns = [
    path("admin/", admin.site.urls),
    path("", TemplateView.as_view(template_name="home.html"), name="home"),
    path("accounts/", include("accounts.urls")),
    path("dashboard/", include("dashboards.urls")),
]
- create urls.py under dashboards app
from django.urls import path
from django.views.generic.base import TemplateView

urlpatterns = [
    path("", TemplateView.as_view(template_name="dashboards/dashboard.html"), name="dashboard"),
]
- create dashboards folder under templates and create dashboard.html file
{% extends 'base.html' %}

{% block title %}Home{% endblock %}

{% block content %}
{% if user.is_authenticated %}

  <h1>Welcome to the Dashboard</h1>
  <p>Hello, {{ user.username }}!</p>
  <p>This is your dashboard content.</p>

  <p><a href="{% url 'logout' %}">Log Out</a></p>
{% else %}
  <p>You are not logged in</p>
  <a href="{% url 'login' %}">Log In</a>
{% endif %}
{% endblock %}
- runserver if you stopped, login and go to
localhost:8000/dashboardto check. - update the accounts/views.py to redirect to dashboard after logged in
from django.shortcuts import render, redirect
from django.contrib.auth.forms import AuthenticationForm
from django.contrib.auth import login, logout


def home(request):
    return render(request, "home.html")


# point to dashboard url
def dashboard(request):
    return render(request, "dashboards/dashboard.html")


def login_view(request):
    if request.method == "POST":
        form = AuthenticationForm(data=request.POST)
        if form.is_valid():
            user = form.get_user()
            login(request, user)
            return redirect("dashboard") # redirect to dashboard
    else:
        form = AuthenticationForm()
    return render(request, "accounts/login.html", {"form": form})


def logout_view(request):
    logout(request)
    return redirect("home")
- check again if it is redirecting to dashboard or not
5. Install django-activity-stream package and settings
- Install django-activity-stream package on the terminal
- make sure the venv is activated
pip install django-activity-stream
- update the settings.py
INSTALLED_APPS = [
    "django.contrib.admin",
    "django.contrib.auth",
    "django.contrib.contenttypes",
    "django.contrib.sessions",
    "django.contrib.messages",
    "django.contrib.staticfiles",
    "dashboards",
    "actstream",
]

SITE_ID=1

ACTSTREAM_SETTINGS = {
    "MANAGER": "dashboards.managers.MyActionManager",
    "FETCH_RELATIONS": True,
    "USE_PREFETCH": True,
    "USE_JSONFIELD": True,
    "GFK_FETCH_DEPTH": 1,
}
- if you are still running server, you will get errors, maybe ImportError.
- If you are not running the server, don’t worry and just follow the steps below.
6. Update Dashboard
- create managers.py under dashboards app
from actstream.managers import ActionManager
from django.contrib.auth.signals import (
    user_logged_in,
    user_logged_out,
    user_login_failed,
)
from actstream import action
from django.dispatch import receiver


class MyActionManager(ActionManager):
    @receiver(user_logged_in)
    def track_login(sender, request, user, **kwargs):
        action.send(user, verb="logged in")
        print(
            "user {} logged in through page {}".format(
                user.username, request.META.get("HTTP_REFERER")
            )
        )

    @receiver(user_logged_out)
    def track_logout(sender, request, user, **kwargs):
        action.send(user, verb="logged out")
        print(
            "user {} logged out through page {}".format(
                user.username, request.META.get("HTTP_REFERER")
            )
        )

    @receiver(user_login_failed)
    def track_login_failed(sender, request, user, **kwargs):
        action.send(user, verb="login failed")
        print(
            "user {} failed to log in through page {}".format(
                user.username, request.META.get("HTTP_REFERER")
            )
        )

    user_logged_in.connect(track_login)
    user_logged_out.connect(track_logout)
    user_login_failed.connect(track_login_failed)
- Again, If your server is running, you will get instruction to migrate. in case you don’t see them, but getting other errors, you might misspelled something.
- again, if you are not running the server, just follow the steps below.
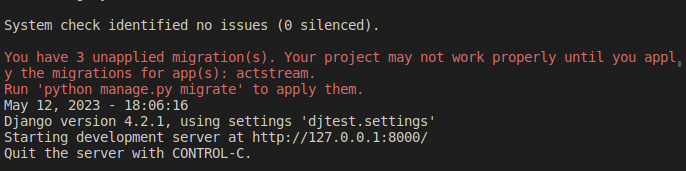
- then, migrate.
python manage.py migrate
- run server if you are not running, go to localhost:8000/admin
- you will see ACTIVITY STREAMS app there.
- update dashboards/models.py
from .managers import MyActionManager
from actstream.models import Action


class MyAction(Action):
    objects = MyActionManager()

    class Meta:
        proxy = True
- Since we update the models.py, we need to update the database again.
python manage.py makemigrations
python manage.py migrate

- update dashboards/admin.py to show MyAction model on django admin.
from django.contrib import admin
from .models import MyAction


admin.site.register(MyAction)
- update dashboards/apps.py
- You can find the description of this on the package docs
from django.apps import AppConfig


class DashboardsConfig(AppConfig):
    name = "dashboards"

    def ready(self):
        from actstream import registry
        from django.contrib.auth.models import User

        registry.register(User, self.get_model("MyAction"))
- I got errors because imports all at first, and found the solution here.
- update dashboards/__init.py__
- I tested without this, and it worked fine. But this is in the package docs, so better to have it. maybe?
default_app_config = "dashboards.apps.DashboardsConfig"
- update dashboards/views.py
from django.views import generic
from .models import MyAction


class MyActionStreamView(generic.ListView):
    model = MyAction
    template_name = "dashboards/dashboard.html"
    context_object_name = "action_list"

    def get_queryset(self):
        # Use custom manager methods or filters for CustomActionManagerOne
        return MyAction.objects.all()
- update dashboards/urls.py
from django.urls import path
from dashboards import views

urlpatterns = [
    path("", views.MyActionStreamView.as_view(), name="dashboard"),
]
- update templates/dashboards/dashboard.html
  <h2>Activity</h2>
  <ul>
    {% for activity in action_list %}
      <li>{{ activity.actor }} {{ activity.verb }} at {{ activity.timestamp }}</li>
    {% empty %}
      <li>No recent activities.</li>
    {% endfor %}
  </ul>
- Now, go to localhost:8000/dashboard to check if you see your login/out activity.
- test with other test users.
- You can see both admin and test user’s logs. we can use permission or maybe the package’s filter function to make it show for certain user. I won’t go over that in this post though.
- Done!!!
- If you want to see the full code, here is the github repo.
Thank you for reading my post!
